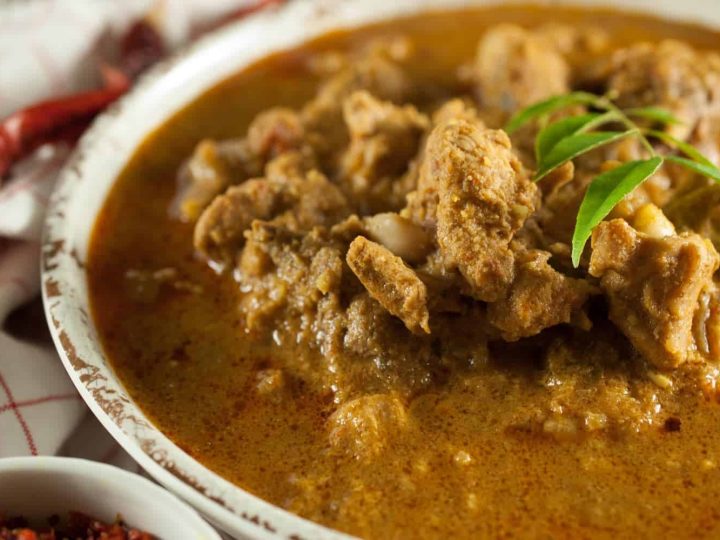
Kerala Chicken Biriyani (Nadan Kozhi Biriyani) was once a special-day dish.Many thought it was too hard to make at home, so it was made only for weddings, feasts, and big family gatherings.Today, it’s a weekend favorite in many homes.
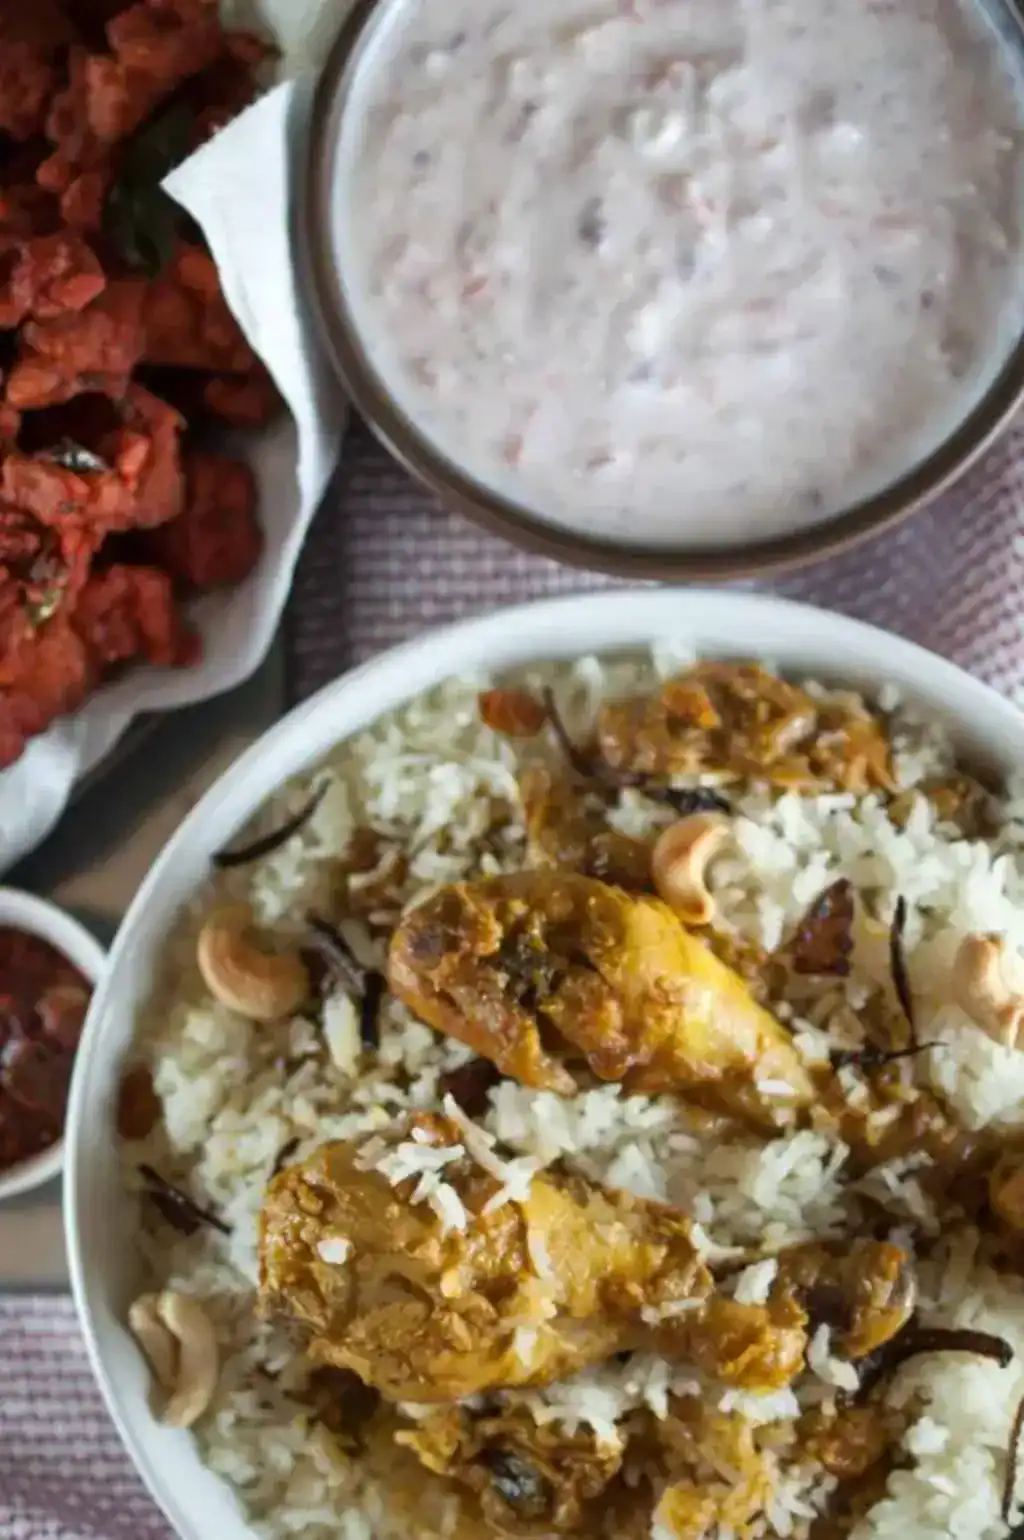
Spicy chicken masala, ghee rice, fried onions, and that bold Kerala flavor. It’s one of the most loved non-veg dishes among Malayalees.
This recipe makes it simple. Step-by-step method, full ingredients, cooking tips, storage guide, and serving ideas are all included. It may feel tricky at first, but once you try, you’ll cook it with ease.
Jump to:
- What is Kerala Style chicken Biriyani?
- Why You'll Love This Recipe
- Recipe Ingredients
- Variations to Try
- How To Make Kerala Style Chicken Biryani? (Step-by-Step Guide)
- Tips And Tricks
- Serving Suggestions
- Storage Instructions
- Frequently Asked Questions (FAQ)
- More Kerala Style Biriyani Recipes To Try
- Kerala Style Chicken Biriyani
What is Kerala Style chicken Biriyani?
Kerala-style chicken biriyani is one of the most loved biryanis across the world. It is made with marinated chicken, Kerala spices, short-grain rice, ghee, and fried onions. The flavor builds through careful layering and slow dum cooking.
When it comes to chicken biriyani across India, there are many popular versions like Hyderabadi, Ambur, Kalyani, Mughlai, and Kerala’s own Thalassery biryani. This recipe comes very close to the Thalassery style in taste and method.
Every step matters. From marination to cooking, resting, and serving. The dish smells rich, looks festive, and tastes perfectly balanced. Kerala Style Beef Biryani is another great choice for biryani lovers.
Why You'll Love This Recipe
Soft rice soaked in rich masala, paired with juicy chicken pieces cooked till tender and finished with a touch of ghee.
Then comes the magic. That light sweetness and crispness from golden fried onions. The crunch of cashews. The burst of raisins. A sweet surprise hidden inside all the spice.
It brings everything together. Taste, smell, texture, and look. All of it in one plate.Every handful feels new. That random mix of different biryani ingredients coming together is what makes it so special.
This biriyani is just one gem from our Kerala Non-Veg Recipe Collection. Explore more hearty dishes and homely flavors.
Recipe Ingredients
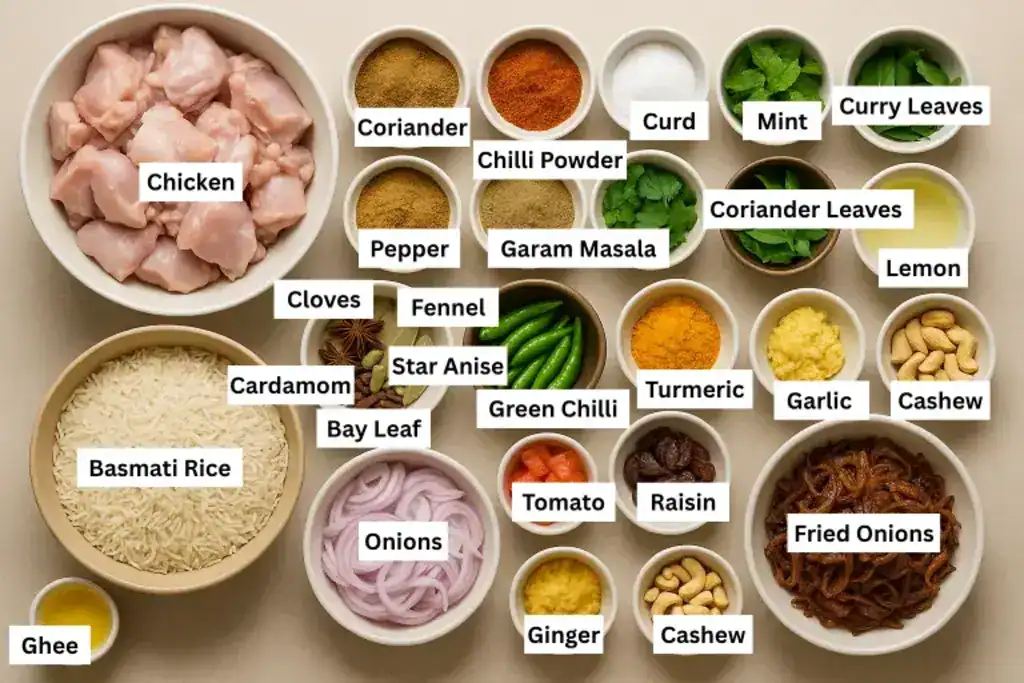
- Chicken: Bone-in pieces work best. When buying, ask the butcher to cut it into 4, 6, or 8 pieces for even cooking and better flavor.
- Rice: Kaima or jeerakasala rice is the best choice for Kerala-style biryani. This small, aromatic rice is unique to Kerala and different from long-grain basmati. You can substitute basmati if needed.
- Spices: Kerala spices enhance the biryani’s flavor. Use both powdered and whole spices. Powdered spices include chili powder, turmeric powder, pepper powder, and coriander powder. Whole spices include fennel seeds, cinnamon, poppy seeds (khashakhasha paste), star anise (thakolam), cloves, cardamom seeds, and bay leaves.
Other ingredients: Detailed measurements and nutritional information are in the recipe card.
Variations to Try
In most Malabar-style biryanis, the chicken is marinated and then shallow fried. This adds another layer of flavor.
Sometimes a small hit of sweetness is added at the end with pomegranate seeds, pineapple pieces, or dates as garnish. This gives a unique twist to the taste.
You can keep the same base of rice and masala but change the protein to fish, beef, mutton, or pork. Fish needs extra care. Check our Nadan Meen Biriyani Recipe for tips.
You can also use vegetables like peas, potatoes, carrots, or soybeans. Fry them until 80 to 90 percent cooked and add them to the masala.
Some versions skip yogurt completely. Every variation has its own special taste.
How To Make Kerala Style Chicken Biryani? (Step-by-Step Guide)
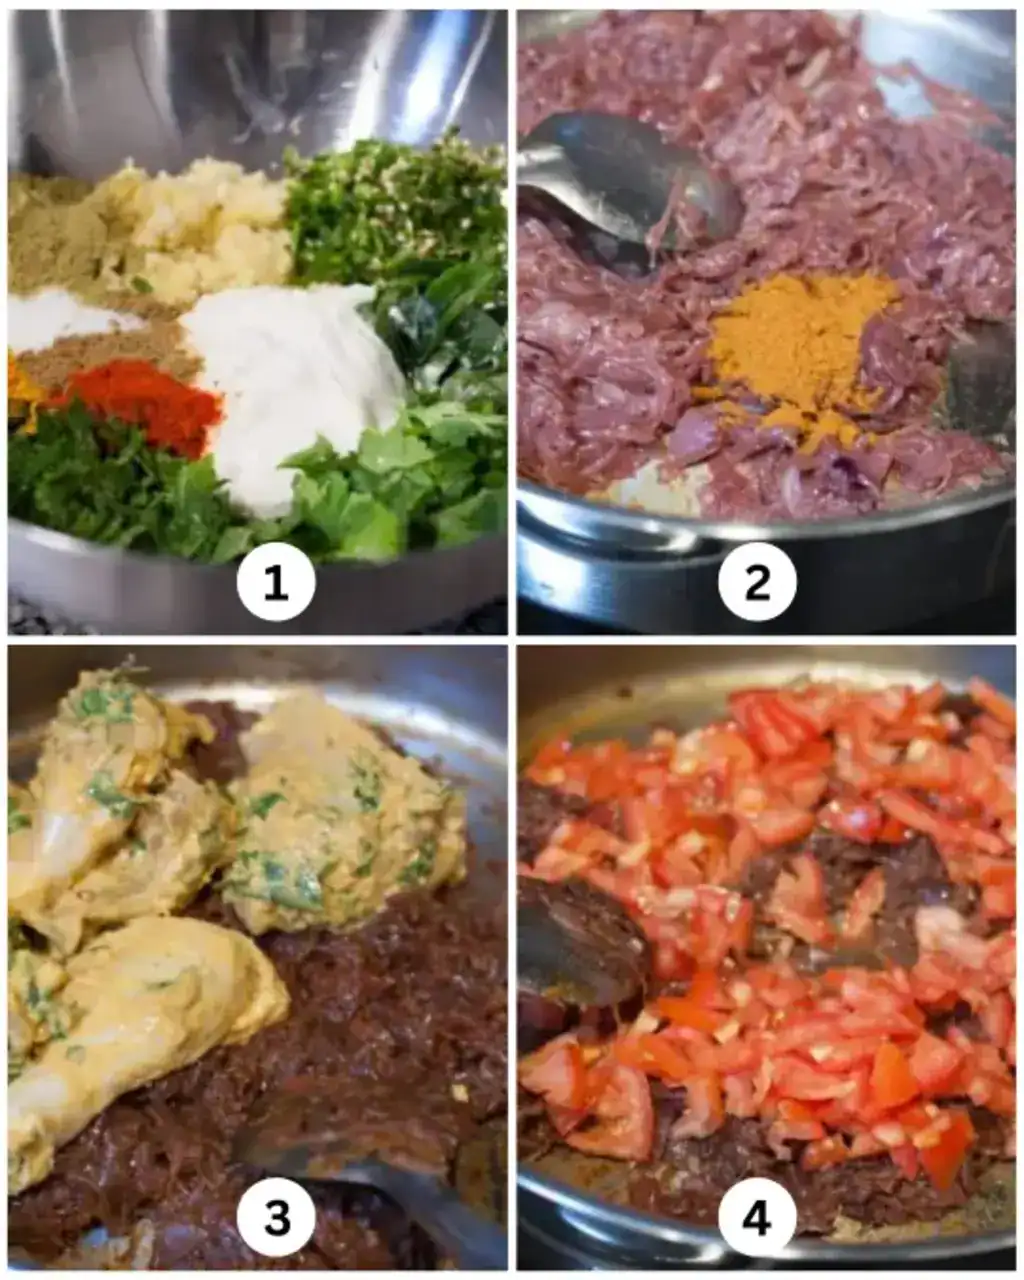
- Mix together ingredients listed under marination. Marinate the chicken well. Refrigerate it for 2 - 3 hours.
- Heat ghee in a pan. Add sliced onions, salt and saute, till they turn brown and then add garam masala.
- Add sliced tomatoes and saute well.
- Add marinated chicken and mix well.Cover the pan and cook until chicken is done.
- Soak rice in water for 1hr. Refer Notes section for another way of rice preparation. Drain the water from the rice. Heat ghee in the pan/ cooker. Add cinnamon, bay leaf, cardamom seeds, curry leaves, cloves and aniseeds.
- Once it is sauted well, add rice. Saute it till rice is crispy.
- Add 6 cup water to it with enough salt. Cover and cook until rice is done. It would approximately take 10 - 15 minutes.
- ** Never miss this step. Layer a pan / cooker with alternating layers of rice and the chicken masala. Add coriander leaves and 1 teaspoon ghee at every layer.

- You can either layer the biriyani and bake in the oven or you can cook on stovetop. Rice and biriyani masala gets blended well with this. You need not add water since biriyani masala has good gravy content. I have tried both. Preheat the oven at 350F. Layer a pan with alternating layers of rice and the chicken. Add coriander leaves, mint leaves, 1 teaspoon ghee, fried onions, cashews and raisins at every layer. Cover the pan with aluminium foil. Bake for 20 minutes. Without aluminium foil, rice gets dried up easily.
- If you wanna cook on stovetop, layer the biriyani in a cooker or in a pan. Cover with a lid and cook for 20 minutes.
- Garnish - Thinly slice 1 onion. Heat ghee in a pan. Fry cashew and then raisins. And then add onion. Sprinkle salt and bit sugar. Deep fry onion.
- Garnish the top of biriyani with the above fried onions and roasted cashews and raisins. Serve it after resting.

If you love chicken and Kerala style but prefer milder, coconut milk-based flavors, try Nadan Kozhi Ishtu.
Tips And Tricks
- Marination: Marinate properly for at least 1 hour. For best flavor, marinate 2 to 3 hours in the fridge.
- Rice cooking: Cook the rice only 80 to 90 percent. It will finish cooking during dum, keeping the grains separate and fluffy.
- Layering: When layering, add rice first, then chicken masala, followed by fried onions, cashews, raisins, a pinch of garam masala, chopped mint, and coriander. If you want a natural color, you can add turmeric water while layering.
- Chicken oil: If frying the chicken, save some of the oil and add it to the rice to boost flavor.
- Stovetop dum: Use a thick-bottomed pan. Layer the biryani, cover with a lid, and seal the edges with foil or a maida paste to keep the steam inside.
- Spice substitute: If you are missing some spices, a good chicken biryani masala powder can be used as a substitute.
Serving Suggestions
Nadan Kozhi Biriyani goes best with traditional sides like raita (yogurt-based), tangy pickles (achar), and crispy lentil wafers (pappadam). In many Kerala homes, it’s also served with thick coconut chutney or fresh coriander chutney.
For a fuller meal, pair it with Thattukada Style Chicken Fry. The spicy, crispy chicken perfectly balances the rich biryani flavors.
Storage Instructions
Refrigerate Kerala Style Chicken Biriyani in an airtight, clean, and dry container for 2 to 3 days. Freezing the whole biryani is not recommended, but you can freeze the masala separately for 1 to 2 months. When needed, defrost and reheat.
For best reheating results, steam the biryani using a steamer. This method helps retain the texture, moisture, and flavor better than microwaving.
Frequently Asked Questions (FAQ)
Biryani turns dry when the rice is overcooked and masala is less. Not enough fat or oil, insufficient moisture in the masala, or not resting the biryani properly can also cause dryness.
Mushy biryani happens due to overcooked rice, too much water in the masala, rice not drained well, or if the rice is not washed thoroughly, leaving starch behind. Stirring the biryani too vigorously after cooking can also make it mushy.
More Kerala Style Biriyani Recipes To Try


I’d love to hear your thoughts if you have tried this! Please leave a ⭐️ rating and a comment below. Don’t forget to share your photos on Instagram and tag @a_little_bit_of_spice

Kerala Style Chicken Biriyani
Ingredients
Marination
- 1 Kilogram chicken
- 1 Cup curd
- 1 Teaspoon cumin Powder
- 4 Teaspoons coriander Powder
- 1 Teaspoon Chilly Powder
- 1 ½ Teaspoons fennel Powder
- 45 Grams green chilli
- 2 Tablespoons garlic (crushed)
- 2 Tablespoons ginger (crushed)
- 1 Teaspoon turmeric Powder
- 2 Teaspoons lemon juice
- 25 grams coriander leaves (½ bunch)
- 25 grams mint leaves
- curry leaves
- 2 teaspoons poppy seeds (Khashakhasha paste) optional
- salt
For rice
- 2 tbsps ghee
- 4 Cups basmati rice
- 7 Cloves
- 5 Cardamom Seeds
- 1 Tablespoon fennel seed (Perinjeerakam)
- 5 cinnamon (1 inch stick)
- 3 Star Anise (Thakolam)
- 3 bay leaves
Masala
- 4 Tablespoons ghee
- 5 onion (medium)
- 3 tomato (medium)
- 3 Teaspoons garam masala
Garnishing
- 1 onion (medium)
- 2 Tablespoons Cashew Nuts
- 1 Tablespoon Raisins
- coriander leaves
Instructions
- Mix together ingredients listed under marination. Marinate the chicken well. Refrigerate it for 2 - 3 hours.
- Heat ghee in a pan. Add sliced onions, salt and saute, till they turn brown and then add garam masala.
- Add sliced tomatoes and saute well.
- Add marinated chicken and mix well.Cover the pan and cook until chicken is done.
- Soak rice in water for 1hr. Refer Notes section for another way of rice preparation. Drain the water from the rice. Heat ghee in the pan/ cooker. Add cinnamon, bay leaf, cardamom seeds, curry leaves, cloves and aniseeds.
- Once it is sauted well, add rice. Saute it till rice is crispy.
- Add 6 cup water to it with enough salt. Cover and cook until rice is done. It would approximately take 10 - 15 minutes.
- ** Never miss this step. Layer a pan / cooker with alternating layers of rice and the chicken masala. Add coriander leaves and 1 teaspoon ghee at every layer.
- You can either layer the biriyani and bake in the oven or you can cook on stovetop. Rice and biriyani masala gets blended well with this. You need not add water since biriyani masala has good gravy content. I have tried both. Preheat the oven at 350F. Layer a pan with alternating layers of rice and the chicken. Add coriander leaves, mint leaves, 1 teaspoon ghee, fried onions, cashews and raisins at every layer. Cover the pan with aluminium foil. Bake for 20 minutes. Without aluminium foil, rice gets dried up easily.
- If you wanna cook on stovetop, layer the biriyani in a cooker or in a pan. Cover with a lid and cook for 20 minutes.
- Garnish - Thinly slice 1 onion. Heat ghee in a pan. Fry cashew and then raisins. And then add onion. Sprinkle salt and bit sugar. Deep fry onion.
- Garnish the top of biriyani with the above fried onions and roasted cashews and raisins. Serve it with raitha, pickle and papad.
Notes
1. Another way of rice preparation with few changes from the recipe - Don't soak rice in water before the rice preparation. Clean rice and add it to the pan/cooker after roasting spices. Add 8 cups of water instead of 6 cups, in that case. Rest of the steps remain the same.


This is the Kerala style preparation, is it not?
@Cherian : you're in so much trouble :P
yeah, this is Kerala style preparation..
@Jane : the wonderful thing about the Biriyani is the number of ways in which it can be prepared - Awadhi style, Hyderabadi style, Malabar style.. so on :)
@Cherian : :P
Jane! I tried this recipe.... It turned out awesome!!
The oly variation I made was I used butter to sauté onions instead of oil...
Great to hear that Neets :)
Great to hear that, Neetu! Upload your biriyani snap :)
nice
very nice recipe, i know how to make france, mutton, biryani also.
very soon i upload my recipes also, iam very much eager about that
omg so yummy iv just had my dinner nd i got hungry so excited to try that
Thankyou Jane Jojo ! I tried this recipe with a slight variation and its so delicious !!!!